We’re taking a break from our regularly scheduled programming for a crafts tutorial today. If that’s not your thing, please skip this post and tune in again on Thursday for a delicious (and healthy) muffin recipe. I was hesitant to put up something that’s not food related, but I polled my Facebook fans and they strongly supported this post. If nothing else, enjoy some pretty rainbow photos…
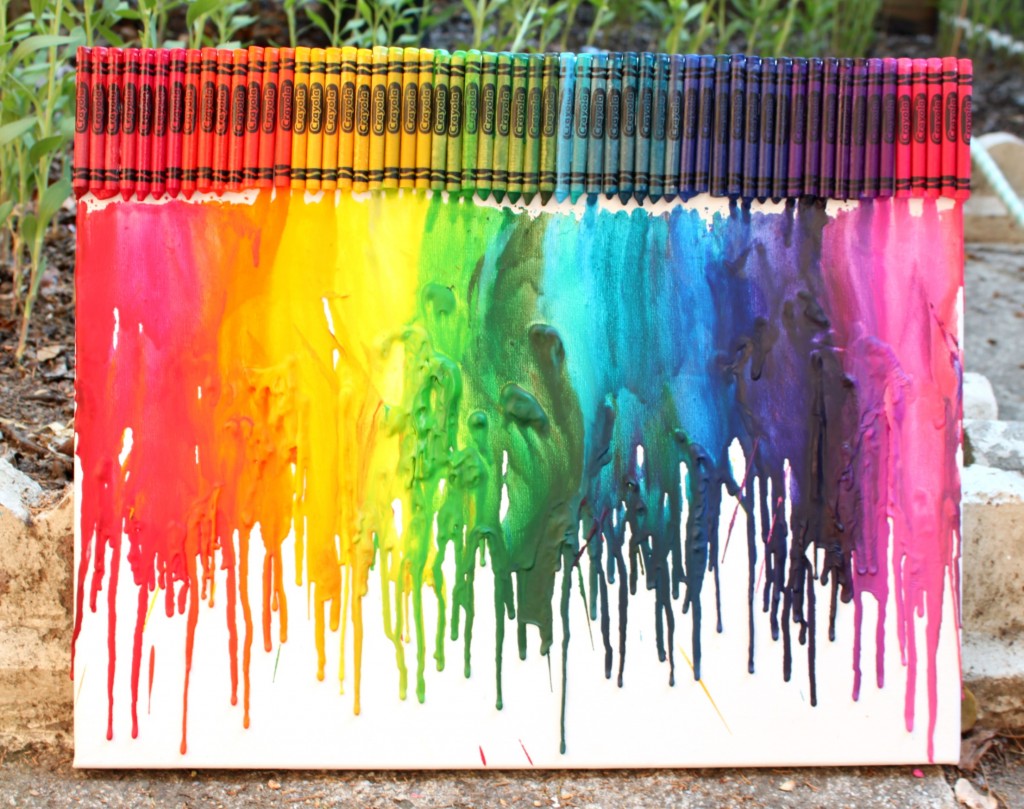
You’ve seen it on Pinterest. They’re being sold on Etsy. These gorgeous melted crayon works of art have been all over the Internet. They’re not that hard to make and really fun, although they take a lot of time and can get boring (do it with a crafty friend if you can). I put together an easy step by step photo tutorial to help you make your own:
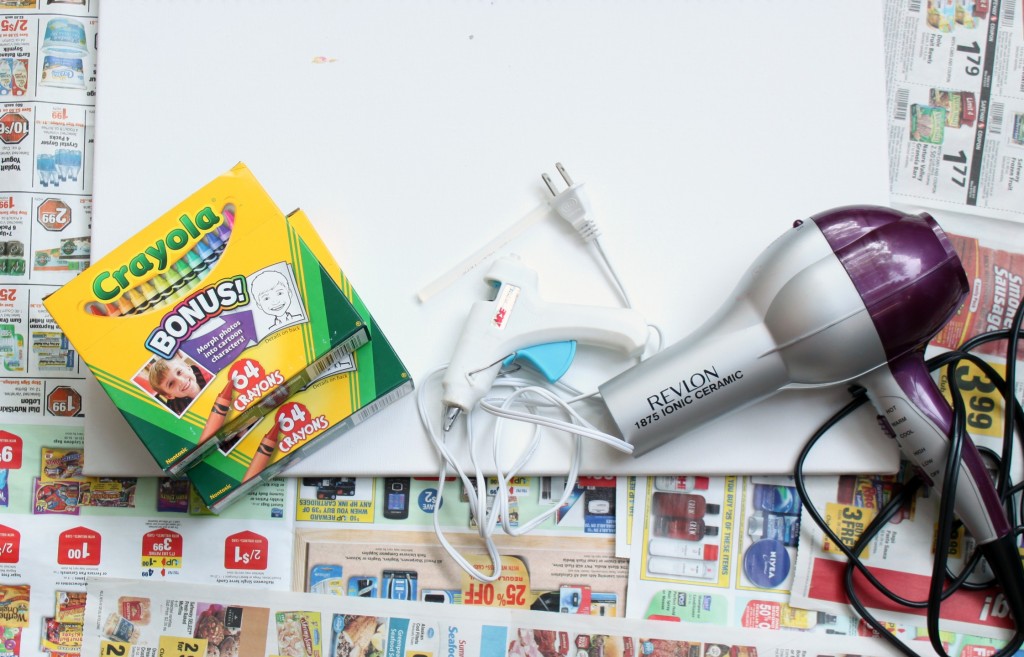
Supplies: you will need a canvas, hot glue gun
, glue stick
, a hair dryer
, lots of crayons
and newspaper. For a 16″x20″ canvas, I used 2 boxes of 64 crayons, plus some extras from a box of 24.
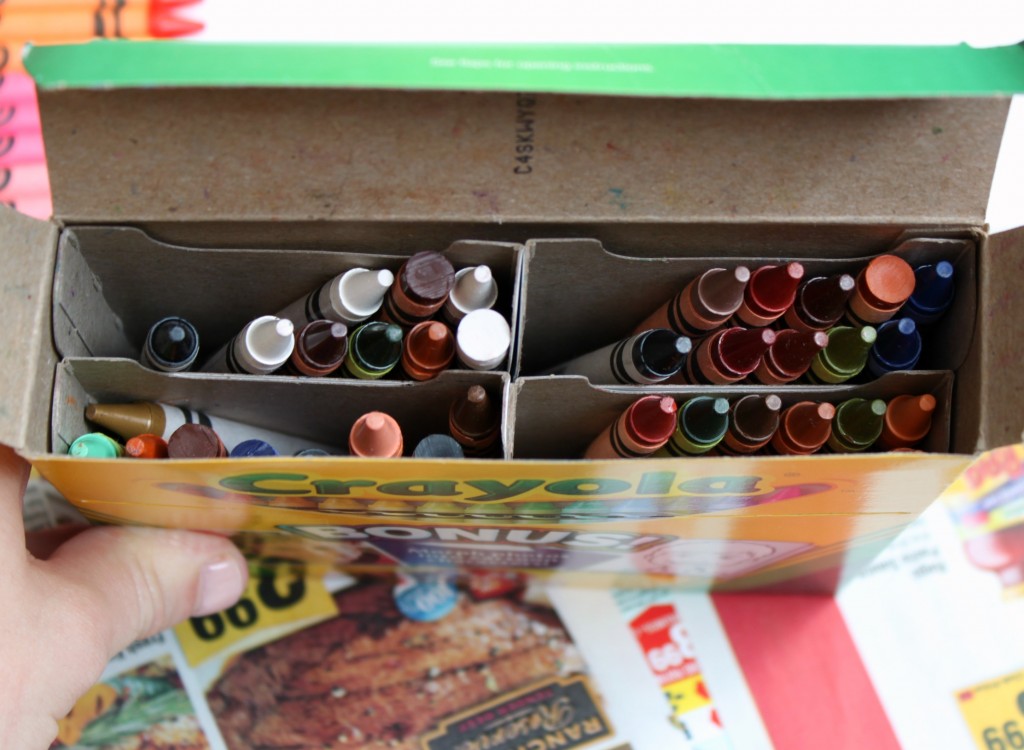
Of course, some colors get rejected, so you will end up with a box like this. I brought all the extras to my school, where I’m sure they’ll get used.
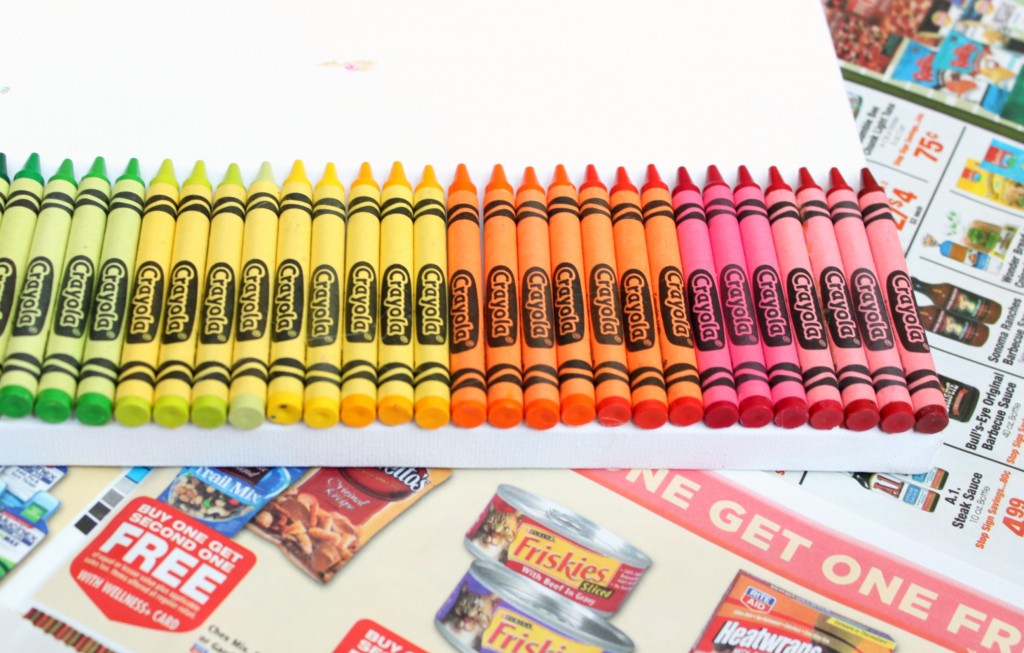
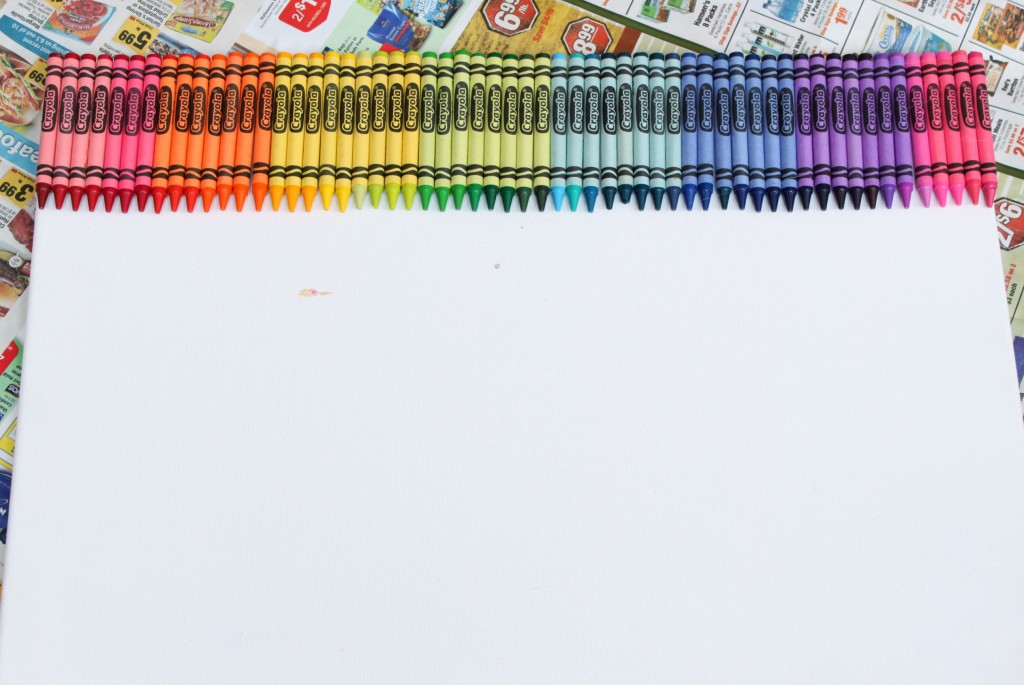
Step 1: Pick out the colors you want to use and line them up until you run out of space.
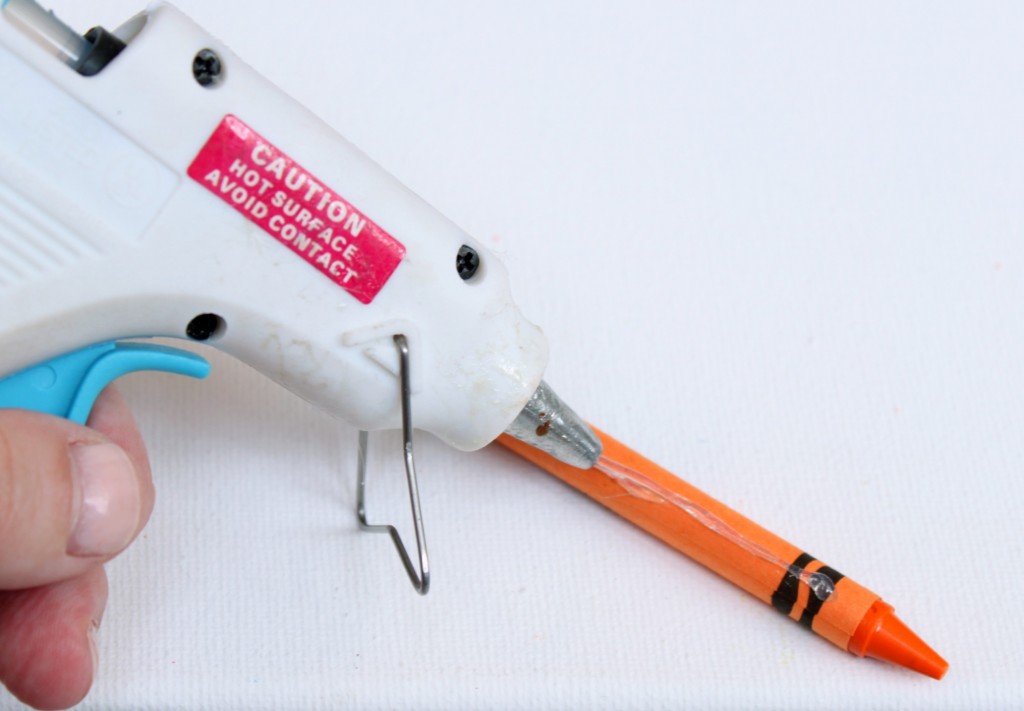
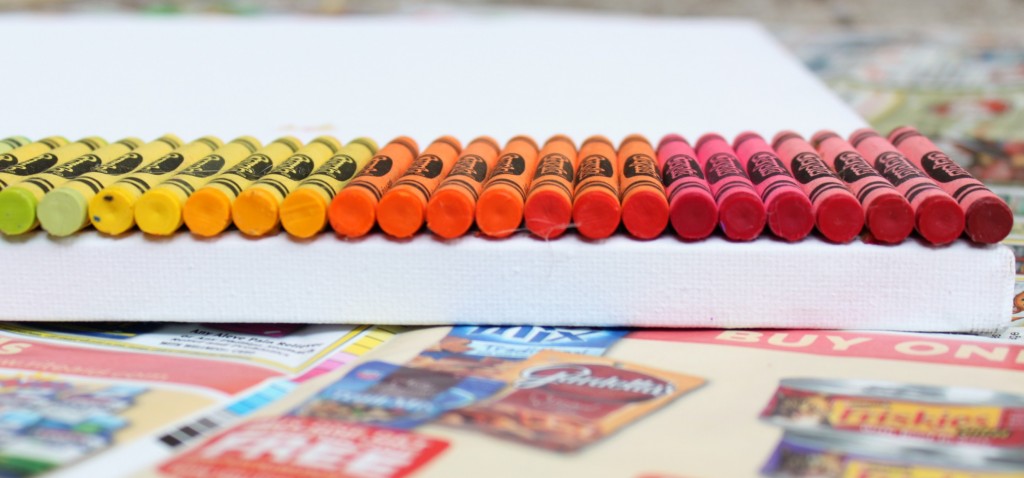
Step 2: Using a glue gun, make a line of glue across the crayons (if you want a certain part showing, like the label, be careful to put the glue on the opposite side). Quickly place onto canvas in a line, as shown below, with tips facing down.
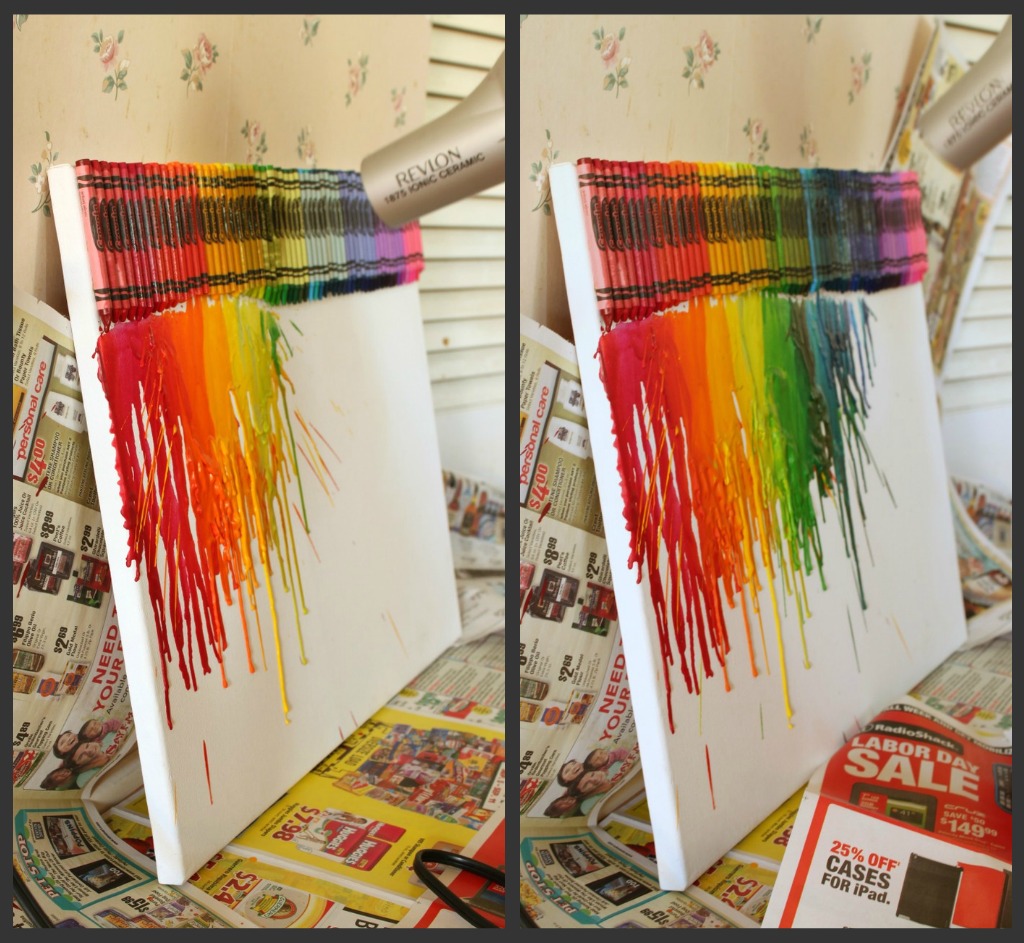
This is how the canvas looked after 5 and 10 minutes.
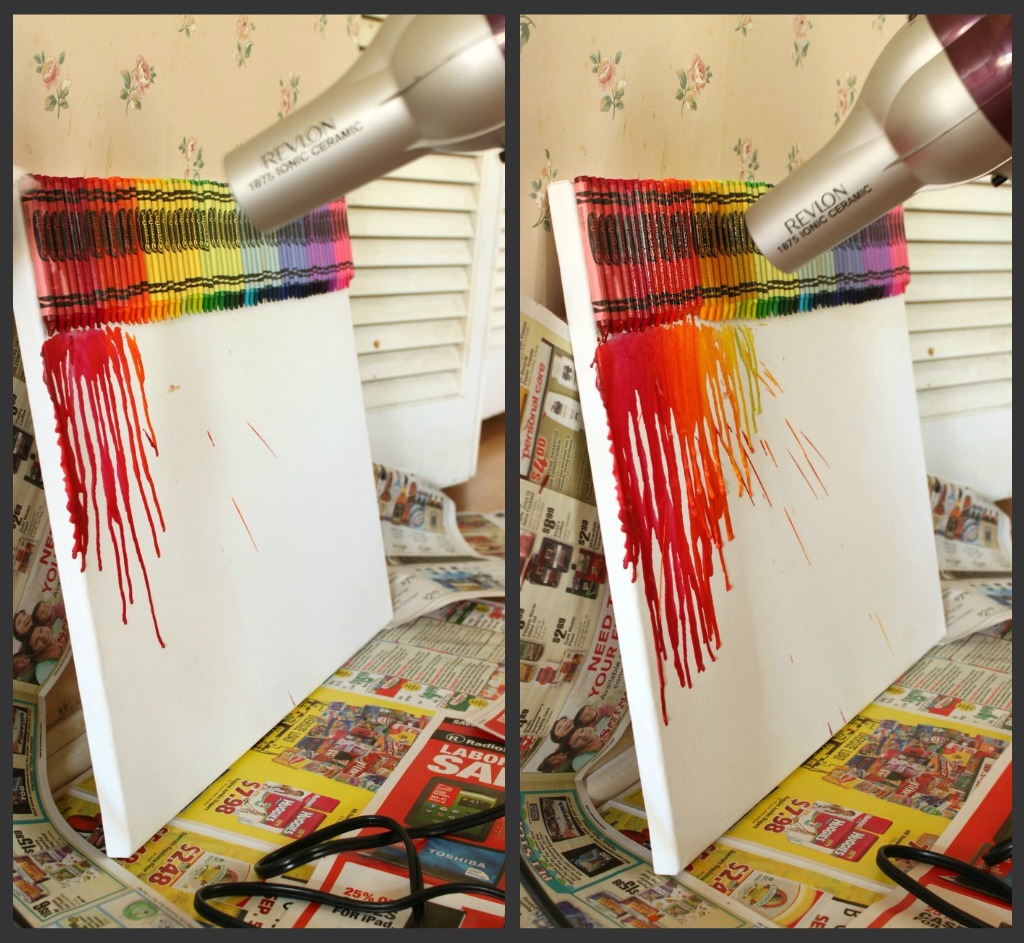
Step 3: Line your floor with newspaper, place the canvas against the wall, and get your blow dryin’ on. I started out on high and warm settings on mine, and alternated with low at certain points. You have to experiment a little to see how your hair dryer works with melting the wax. It sometimes splatters a little, so be sure to cover the floor and surrounding wall, and turn to a lower setting if needed.
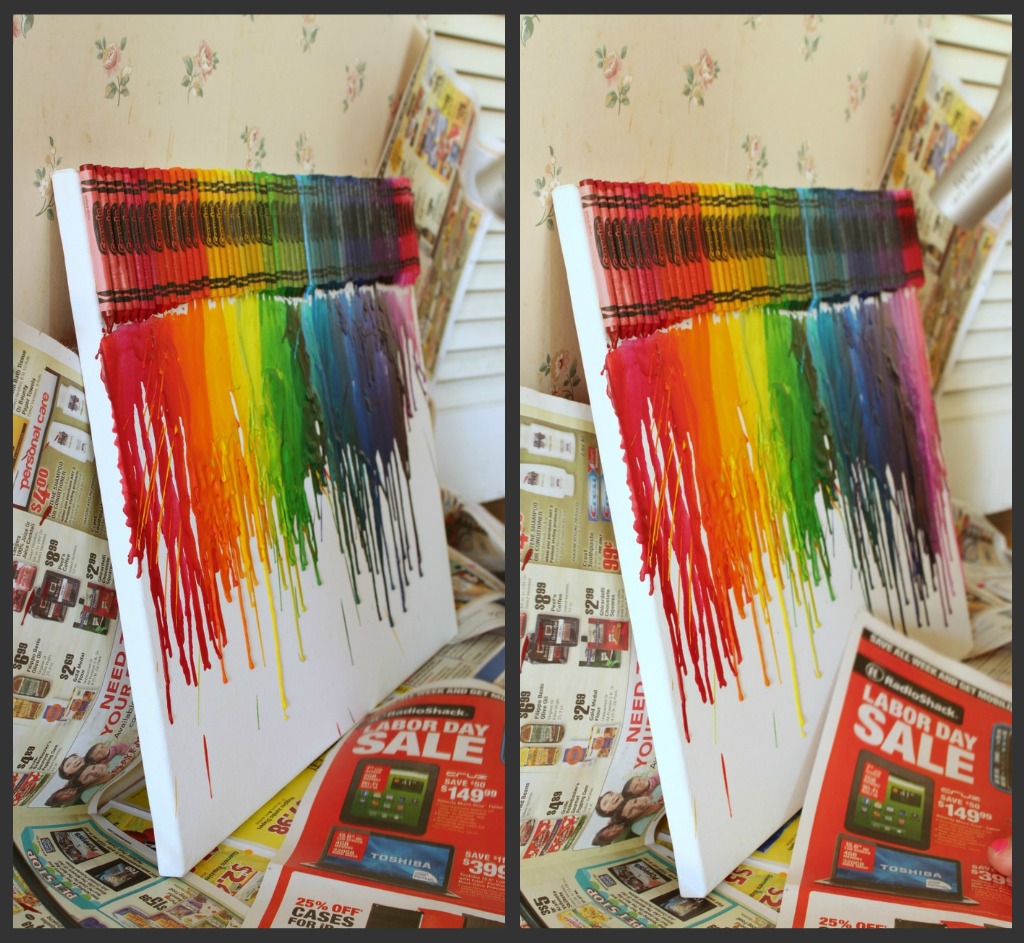
This is after 20 and 30 minutes.
I like to concentrate on one area at a time, working my way across the canvas. It takes 5-10 minutes on each area, with 4-5 areas across this 20″ canvas. Aim the heat right at the mid to bottom of the crayons (where the tips are). Once the wax starts melting, move the dryer around as needed to prevent splattering and get wax to go straight down.
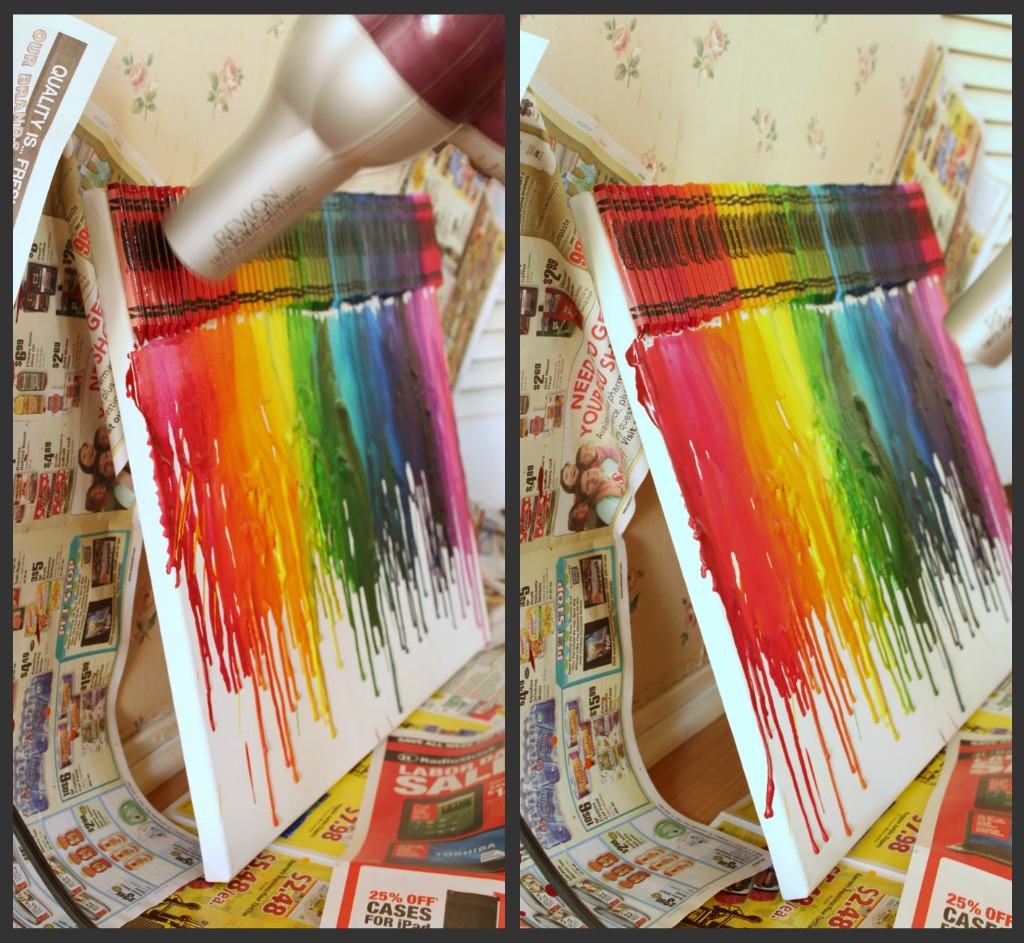
This is after 50 and 60 minutes.
It took me about an hour to make it across the canvas, getting all the colors to melt sufficiently. Oddly, some colors melt much faster than others – any chemists out there know why? Yellow is particularly slow.
This is after an 70 and 80 minutes.
Step 4 (optional): After getting all the colors to melt, I went back over certain colors that I wanted to go further down the canvas. As you can see in the photo on the right, I aimed the heat at the middle of the canvas to melt some of the chunks of wax and get them to drip all the way to the bottom of the canvas.
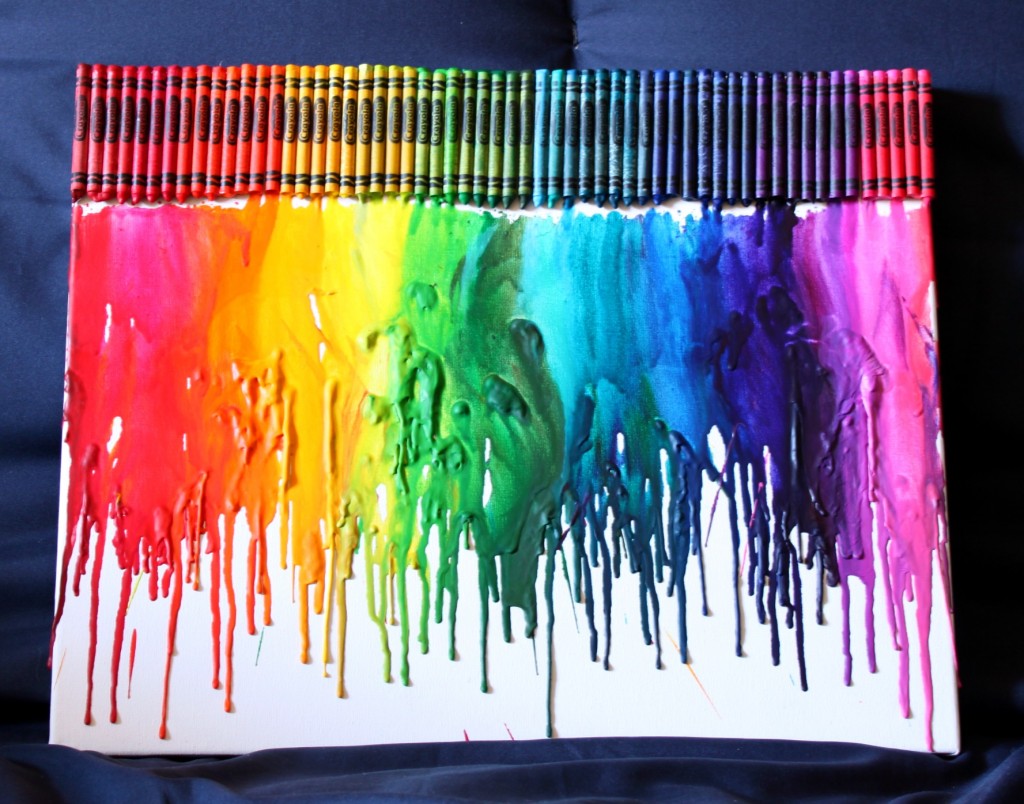
And voila! You have a fun piece of art to hang on your wall. Of course you can try this with different color patterns instead of a rainbow.
Which colors would you use?
More recipes you’ll love:
225 Comments on Melted Crayon Art Tutorial
37Pingbacks & Trackbacks on Melted Crayon Art Tutorial
-
[…] So this past Friday night my friends and I were bored in our suite so we decided to make some crayon art that we had originally seen on Pinterest. (source:http://www.52kitchenadventures.com/2011/09/12/melted-crayon-art-tutorial/) […]
-
[…] and research (I love looking at other art for inspiration), I came across this wonderful Crayon Art Tutorial by 52 Kitchen Adventures – I’m sure you might have seen it on Pinterest at some point […]
-
[…] Melted Crayon Art Tutorial […]
-
[…] Kitchen Adventures offers a clear step-by-step melted crayon tutorial. Just follow the directions. You can’t go […]
-
[…] like to try and make your own crayon art? Check out this melted crayon art tutorial, or youtube video […]
-
[…] we got really Pinterest crafty. If you follow healthierhopeful on Instagram, you’ve seen my crayon creation! We also had our way with a lot of glitter. I splurged with this fantastic dessert her mom makes, […]
-
[…] Melted Crayon Rainbow Art […]
-
[…] 3. Do you have the patience for this piece of art? — Melted Crayon Art Tutorial […]
-
[…] Melted crayon art […]
-
[…] like to try and make your own crayon art? Check out this melted crayon art tutorial, or youtube video […]
-
[…] lots of crayons (We suggest 2 boxes of 24) and newspaper. We found a step by step photo tutorial here!There you have it! Try out some of these projects and send us pictures! We might feature yours on […]
-
[…] a craft that I found on stumbleupon. It was fairly easy an came out pretty amazing, the tutorial is here, try it if you have some spare time…and some […]
-
[…] and numerous blogs, crafting has become a new thing to do amongst many. Some popular crafts include melting crayon paintings, elbow patches, and hanging […]
-
[…] Images by Megan Giles and 52 Kitchen Adventures […]
-
[…] on a craft to do for their rooms. The girls chose to do the Melted Crayon Wall art that we pinned in the beginning, they wanted to do this on a smaller scale so it would fit better in their new […]
-
[…] food. In 2011, I kept seeing images of melted crayon art all over Pinterest, so I blogged about the step by step process of making my own melted crayon rainbow. The post took off on Pinterest and I still get a ton of traffic to it to this day. My image was […]
-
[…] and Idea courtesy of 52 Kitchen Adventures! If you want recipes for delicious desserts, check them […]
-
[…] Melted Crayon Canvas Art ~ Melted Crayon Canvas art is all the rage right now, but actually finding a tutorial is harder […]
-
[…] You may be saying, “Well I don’t have time to do arts and crafts,” but you are indeed mistaken. Some activities take no longer than five minutes. One such example is a DIY lip exfoliating scrub that has various recipes, but the most simple of them all is made up of a half tsp. of olive oil, 2 tbsp. of white sugar, and 1 tsp. of honey. It is not time consuming to create this exfoliator, and using it also does not take very long. Simply rub the product on your lips in a circular motion for a minute, and huzzah, you’ll have smooth lips. Image found at 52kitchenadventures […]
-
[…] is a homemade melted crayon art piece with a few modifications. I used a canvas, some old crayons, cotton balls, and paper […]
-
[…] smile on you and your tot’s fact. Check out this quick and simple Crayon art tutorial from 52 Kitchen Adventures that you can do right at home with old crayons. Get […]
-
[…] 2.) Melted Crayon On Canvas […]
-
[…] creativejewishmom D. Paper cup garland from minted E. Make a rainbow necklace from nurturestore G. Melted crayon art from 52kitchenadventures H. Homemade water colour paints from allparenting G. How to paint a […]
-
[…] 16/05/2014 news Leave a comment I finally did it!I've seen this project on the web so many times.I did it and loved it!I found my favorite set of instruction here. […]
-
[…] 39. Create some canvas crayon art. […]
-
[…] DIY and photo credit to: http://www.52kitchenadventures.com […]
-
[…] Adventures because her post looks beautiful and hey! who says a cooking website can’t have an artsy post now and […]
-
[…]  Melted Crayon Canvas Art {52 Kitchen Adventures} ~  Melted Crayon Canvas art is all the rage right now, but […]
-
[…] Image Source […]
-
[…] Make Melted Crayon Art by 52 Kitchen Adventures – another great way to decorate a playroom or creative […]
-
[…] Melted Crayon Canvas Art ~ Melted Crayon Canvas art is all the rage right now, but actually finding a tutorial is harder […]
-
[…] Rainbow Melted Crayon Art: This art project is SUPER fun and so colorful! Get the instructions from 52 Kitchen […]
-
[…] Melting crayon canvas for my dad’s classroom! See this site for a good tutorial: http://www.52kitchenadve… […]
-
[…] MELTED CRAYON ART From 52 Kitchen Adventures […]
-
[…] MELTED CRAYON ART From 52 Kitchen Adventures […]
-
[…] via […]
-
[…] This tutorial will give you step-by-step instructions on how you can make this melted crayon art piece. You need to have a canvas along with a large box of crayons. Besides this, a hairdryer is also required here for melting the crayons and ending up in creating a masterpiece. here! […]



Janelle
September 12, 2011 at 11:15 am (13 years ago)I’ve pinned two different melted crayon art projects, but the one I really like is purposeful, not just melty. It’s here: http://pinterest.com/pin/140773990/
Stephanie
September 15, 2011 at 9:23 pm (13 years ago)@Janelle – I love that one too! Turning melted green crayons into a garden is a great idea.
Lisa Whitmer
October 12, 2011 at 10:55 am (13 years ago)What a great idea Janelle – thank you for taking the time to post picture. My daughter and her friend are working on this now and are LOVING it!! I wanted to come up with an idea for them to use up the browns & blacks left over. -LMW in Burke, VA
Tami
October 17, 2011 at 8:51 am (13 years ago)I used an embossing tool to melt the crayons and it went fairly quick. Plus, the air is not as strong as a blow dryer.
Stephanie
October 17, 2011 at 4:40 pm (13 years ago)@Tami – that’s a great idea! Thanks for sharing it with us.
Tricia
December 5, 2011 at 10:06 am (13 years ago)fab picture….would love to try this out… did you make flowers from crayons also? How?
Stephanie
December 5, 2011 at 1:39 pm (13 years ago)@Tricia – I’ve never made a flower one, but one that I saw used crayons in the color of stems and melted a few of those, then turned it upside down and glued on fake flowers to the ends of the wax drips.
Angela B.
July 9, 2019 at 7:16 pm (6 years ago)I clearly did something wrong! Crayons didn’t melt, except for the tips which flew off and the glue melted so the crayons eventually fell off the canvas. #sad
Andrea
September 12, 2011 at 2:44 pm (13 years ago)I’m glad you posted this! Really, really cool idea. If I did it, I might have used difference shades of purple, green, and cream.
Stephanie
September 15, 2011 at 9:23 pm (13 years ago)@Andrea – that would be a lovely color scheme!
CDCLOTH
January 17, 2017 at 1:50 am (8 years ago)This is a great fun project to do at home! I was wondering if you could then take off the crayons when you’re done melting? This way it would look like an even more fabulous piece of art!
Andrea Rose
September 12, 2011 at 6:24 pm (13 years ago)Wow, this is an awesome idea! I’ve made melted crayon crayons! As in, melting crayons to make new crayons in different shapes and colors. But this is a neat idea, I might just try this for a gift to someone! I think some cool colors would be some yellows, reds, pinks, and oranges. Or yellows and grays 🙂
Stephanie
September 15, 2011 at 9:23 pm (13 years ago)@Andrea Rose – I think this would make a great gift.
Kat @ Big Apple Little Kitchen
September 13, 2011 at 5:38 am (13 years ago)I love this idea! Crayons make me feel like I’m back in 2nd grade!
Stephanie
September 15, 2011 at 9:23 pm (13 years ago)@Kat – haha totally!
Adrianna
November 17, 2019 at 11:29 pm (5 years ago)i love this idea to it looks like so much fun
Kari
September 13, 2011 at 10:18 am (13 years ago)How much of the crayon gets used in this process? would you be able to re-use for more pieces?
Stephanie
September 15, 2011 at 9:25 pm (13 years ago)@Kari – it depends on the size of your canvas and how much you get to melt. You might be able to re-use some once.
Tara
January 5, 2016 at 7:42 am (9 years ago)This is a great fun project to do at home! I was wondering if you could then take off the crayons when you’re done melting? This way it would look like an even more fabulous piece of art!
Krista {Budget Gourmet Mom}
September 15, 2011 at 9:16 pm (13 years ago)I know it’s not your regularly scheduled recipes but this is definitely a “recipe” that I love! That is so incredibly awesome! I’m so glad you decided to share it.
Krista {Budget Gourmet Mom} recently posted Twice Baked Pumpkin Potatoes
Stephanie
September 15, 2011 at 9:25 pm (13 years ago)@Krista – it’s like a non-edible recipe. Glad you enjoyed it!
Susie
September 15, 2011 at 9:44 pm (13 years ago)WOW! That looks like a ton of fun. It looks super cool my son would love it.
Susie recently posted Calamari – Kikkoman Kara-Age Review
Stephanie
September 15, 2011 at 9:54 pm (13 years ago)@Susie – it’s a lot of fun. I think it’d be fun to do with kids!
Peggy
September 16, 2011 at 5:01 am (13 years ago)This is so awesome! I must live under a rock because this is the first I’m seeing of this – but you better believe once I have some free time, I’m getting myself a couple boxes of crayons =)
Peggy recently posted Strawberry-Cucumber Salsa
torviewtoronto
September 16, 2011 at 3:03 pm (13 years ago)colourful art looks wonderful
Michelle
September 17, 2011 at 12:47 pm (13 years ago)Such a cool project!! The results are beautiful!
Michelle recently posted It’s a Pancake Party!
The Mom Chef ~ Taking on Magazines One Recipe at a Time
September 17, 2011 at 7:41 pm (13 years ago)I’ve never seen this before. I think it’s cool. Too bad I didn’t know earlier, when the temps here were close to 100. I could have just left the canvas outside and let the sun do the melting.
I’d probably do a canvas in blues, greens and whites to match the sky, trees and clouds.
The Mom Chef ~ Taking on Magazines One Recipe at a Time recently posted Pasta Frittata from Food Network Magazine, September 2011
Brianna
September 18, 2011 at 9:43 am (13 years ago)Thats soooooo amazing. I want to try that on the top of my door!!!
Pamela
September 18, 2011 at 11:18 am (13 years ago)Regarding the “How to Make Rainbow Crayon Art,” I am assuming that the crayon does not melt easily after being hung on walls – In looking at how long it took to melt the crayon? That would be my concern. But I LOVE this. And it’s easy to do.
Stephanie
September 18, 2011 at 1:17 pm (13 years ago)@Pamela – it took a little over an hour for the 16″x20″ shown in this post. It depends on how hot your hairdryer gets and how much you want them to melt.
Emily
September 18, 2011 at 1:30 pm (13 years ago)Great idea!!! Would this project work on sturdy cardstock or posterboard?
Stephanie
September 18, 2011 at 1:42 pm (13 years ago)@Emily – that’s a great question. I’m not sure but it’s worth a try. Let me know if you do try – now I’m really curious! If it’s a matter of cost, look for a Michael’s coupon or wait until they put canvases on sale – I got a 2 pack of 16″x20″ for $5 there!
kathy bunkofske
October 21, 2011 at 4:38 pm (13 years ago)Stephanie–i am completely new to this kind of a craft. do you just use a real canvas=like you paint on or what? would their be a “technical name” for it? that way when i went into the store to ask for it -they would know what i was talking about! thanks you so much. love this idea =can’t wait to share with my granddaughters:)
kathyb
Stephanie
October 21, 2011 at 5:01 pm (13 years ago)@Kathy – yes, a real canvas like one you would paint on. You can ask for a canvas at a crafts store like Michael’s – they have a whole aisle full of them. Have fun!
mjskit
September 18, 2011 at 6:52 pm (13 years ago)Absolutely love it!
mjskit recently posted Part II – New Mexcio Red Chile and Giveaway
Elina (Healthy and Sane)
September 18, 2011 at 7:41 pm (13 years ago)I LOVE this!! Definitely pinning it. So colorful and bright.
Owen Hernandez
September 18, 2011 at 9:14 pm (13 years ago)Excellent artwork ideas! I want color yellow with green, I think it is very much refreshing. Melting of crayons are such an excellent idea, and thanks for sharing this excellent ideas! Keep sharing!
Owen Hernandez recently posted Bank Repossessed Cars
Alyssa
September 21, 2011 at 8:45 pm (13 years ago)The yellow crayons have larger pigments than the other crayons, so they melt slower! Naples yellow has one of the largest pigments, imagine how slow it would have been
cathi carpenter
September 24, 2011 at 5:21 am (13 years ago)SUPER awesome!!! I am already thinking of colors…my living room area is all browns and blacks…so I don’t know….I love this! Maybe all in BLUES for my son’s room….
Darla
September 24, 2011 at 7:19 am (13 years ago)Just made one last night and posted it this morning.
Darla recently posted Crayons Aren’t Just For Children…(a borrowed idea)
Katherine
October 4, 2011 at 4:32 am (13 years ago)I saw this on Pinterest, what a cool idea! This would look great in the playroom!
Jaybee
October 5, 2011 at 9:31 am (13 years ago)Love this so much I made two already 🙂
melissa
October 5, 2011 at 6:44 pm (13 years ago)make sure you use crayola crayons. I used dollar store type and they did not work at all! very disappointed.. thats what i get for trying to go the cheap route i guess! 🙂
Mel the Crafty Scientist
October 19, 2011 at 11:58 am (13 years ago)I absolutely LOOOVE this idea and project and how it turned out! I cannot wait to make one! I also wanted to tell you that I featured you over at my blog here. Please feel free to grab a featured button if you want!
-Mel the Crafty Scientist
Miranda Blackstone
October 19, 2011 at 3:32 pm (13 years ago)I did one of these and hung it in my living room, everyone whose seen it loves it! I also did one with some of the reject colors…I bought a black canvas and did the same thing with white and silver crayons and it looks pretty cool.
kathy bunkofske
October 21, 2011 at 4:30 pm (13 years ago)this black canvas and the silver and white sounds absolutely amazing!!!
thanks for sharing this idea also:)
Monica
November 7, 2011 at 6:49 pm (13 years ago)Some other sites say to peel the paper off the crayons first, did you do this? Any idea if the Glitter or Metallic crayons would melt like this?
Stephanie
November 7, 2011 at 8:37 pm (13 years ago)@Monica – I left the paper on the crayons. It doesn’t interfere with the melting process and I like the way it looks with the paper on. I don’t know if the glitter or metallic crayons melt as well, but they would look really cool if they do!
Hisham Soliman
November 17, 2011 at 3:15 pm (13 years ago)great idea, I would prefer it with the paper off.
Joanna
November 21, 2011 at 8:45 am (13 years ago)Hi, this is a great idea, but what if I wanted to take the crayons off the top of the canvass, would I just glue them without the paper?
Stephanie
November 21, 2011 at 8:24 pm (13 years ago)@Joanna – if you want to take the crayons off after, I would attach them with something less permanent (like tape).
COLLEEN
November 25, 2011 at 11:21 pm (13 years ago)YOU CAN USE DOUBLE-SIDED TAPE AS WELL. YOU MIGHT WANT TO ADD GLASS BEADS OR SEQUINS OR SPARKLE. GOOGLE THEA HAUBRICK ENCAUSTICS AND JOIN. THEN POST YOUR VIDEO. I DO NOT KNOW HOW TO ADD IT MYSELF.
Tarey Azbell
November 26, 2011 at 9:14 am (13 years ago)Hello. I seen this on Pinterest. Love it!!! Try melting crayons in a silicone mold for different crayon shapes. Great for little kids so they can hold onto them better. Also you can make your own colors by doing this. =)
I can totally see this project being done for a baby’s room…esp pink for a girl…different shades. =) Love it! You can also re-wrap the crayons with your own labels…maybe with a child’s name or something printed off of the computer…or do the alphabet? This can be done in so many ways! =)
Lizzie
November 29, 2011 at 9:41 pm (13 years ago)Great idea! Do you think this would work on a piece of wood rather then a canvas?
Stephanie
November 30, 2011 at 7:24 am (13 years ago)@Lizzie – I haven’t tried it on wood but I think it would work. Worth a try!
COLLEEN
November 30, 2011 at 10:23 am (13 years ago)THE TECHNICAL TERM IS ENCAUSTIC. THEREFORE, ONCE YOU GOOGLE ENCAUSTIC OR ENCAUSTICS YOU WILL NEVER LOOK BACK. GENERALLY ONE WOULD USE BEESWAX. I DIE MY BEESWAX WITH CRAYONS, OIL PAINTS, WATERCOLOURS, WHATEVER. THIS IS A VERY ADDICTIVE HOBBY. MANY REQUIRE A TORCH GUN, AS IN CREME BRULEE TORCH GUN, AND A HOT AIR GUN, TO GET THE SHOW ON THE ROAD. YOU DO NOT NEED TO BE AN ARTIST. AND THIS STUFF SELLS.
Tammy
November 30, 2011 at 12:58 pm (13 years ago)Ok, so I did this with an ‘off’ brand (been sitting in basement, not getting used) and it DID NOT melt like the Crayola brand did. It was a watery-wax substance that melted off, not the actual color. Just a heads up so no one else makes the same mistake I did!
Stephanie
November 30, 2011 at 3:04 pm (13 years ago)@Tammy – oh no! That’s really good to know, thank you for sharing with us.
Rebeka Green
December 4, 2011 at 8:42 am (13 years ago)Juat tried this amazing project and it turned out beautiful!!! I love it:)
One tip that I would give is to use a propane blow torch instead of a hair dryer. It goes much faster and the colors drip straight down instead of splattering:)
Stephanie
December 4, 2011 at 6:23 pm (13 years ago)@Rebeka – what a great tip! I hadn’t thought of using a torch. Thanks for sharing 🙂
COLLEEN
December 4, 2011 at 7:51 pm (13 years ago)YES. A CREME BRULLE TORCH. THEY ARE EXPENSIVE. TONIGHT I PICKED UP A BIC BRIQUET MEGA LIGHTER INEXPENSIVE. SO I WILL SEE HOW THIS WORKS FOR SHELLAC AND BURN ON CANVAS.
Will
December 23, 2011 at 1:45 pm (13 years ago)I just did this project and it took about an hour. I used the same hair dryer and the only problem I had was that I was a little impatient and wound up splattering some of the wax. I’d be interested in seeing how this look after an hour under a heat lamp.
Casey
December 30, 2011 at 6:31 am (13 years ago)The darker colors melt faster because they have more dye in them. I did a science fair project once with candles like that. Its the same with candles.
Adriana
December 31, 2011 at 6:04 am (13 years ago)I’m thinking about doing this project for my daughters room with pinks and browns to match her bed set. I’m wondering if I can tape off her name in the middle of the canvas and peel it off after it has dried.. I plan on using a shorter wide canvas and a heat gun since I’m inpatient!
dangela
January 9, 2012 at 6:57 pm (13 years ago)I tried this and found that the crayon after it dried it started to peel in places. Do you have any suggestions?
sonia
January 15, 2012 at 12:07 pm (13 years ago)that is totally wicked!!!!!!!!!! i have so gotta try that!!!! but eeps.. i dunno if i can let go of my crayons xD ….
Logan
January 18, 2012 at 2:39 pm (13 years ago)This looks awesome i want to try it but im afraid of messing it up. :/
Jasmine
January 22, 2012 at 7:38 am (13 years ago)“Since darker colored objects absorb more energy, the albedo of a darker crayon is probably lower than the albedo of a lighter crayon. This means the darker crayon, while absorbing more energy, will heat up faster than the lighter crayon. ”
http://wiki.answers.com/Q/Does_the_color_of_crayon_affect_it's_melting_rate
Yael
January 22, 2012 at 8:18 am (13 years ago)that is so very cool!!!!!
Yael recently posted eons… i know….
Jenny
January 22, 2012 at 10:57 am (13 years ago)very cool! I love the abstract-ness of this project, and BTW very nice step by step tutorial! Another fun way to use crayons is to put them in a mini-muffin tin and set them on an electric griddle. It keep them melted at a constant temp so you can “paint” with them. I save bit of crayons, think I’ll give this a try! Thanks for posting.
Cassie
January 23, 2012 at 10:50 am (13 years ago)Thanks for the tutorial! I can’t wait to do some! I’ve got some friends who are completely into my little pony I’m thinking I’ll be using some of those color patterns for a few gifts 🙂
Alice
January 23, 2012 at 1:19 pm (13 years ago)If people don’t like the “splatter” effect using the blow dryer – I highly recommend doing this project on a sunny/hot summer day! Glue the crayons like so, then place the canvas tilted however you want outside and leave it out in the sun for a while – that way the wax drips in one direction! 🙂 Lovely tutorial!
Christy
January 24, 2012 at 10:26 am (13 years ago)I am expecting a girl in 9 weeks 2 days (but who’s counting) this is going to be in her room as art work. I CAN”T Wait to do it! Thanks for the WONDERFUL tutorial!
Colleen
January 24, 2012 at 8:28 pm (13 years ago)My bf Matt and I make custom melted crayon artwork. If you’d like to check it out, here’s a link: http://thegrandcrayonyon.tumblr.com – Thank you! 🙂
Stephanie C
February 8, 2012 at 3:03 pm (13 years ago)Do you think if I painted a canvas the wax would stick?
Margrett Diven
February 12, 2012 at 10:13 am (13 years ago)Using colors like that makes an interesting project. There are many color to choose from and choosing them in a specific order will make a big difference. Just like paint for your home when decorating.
garrett
February 15, 2012 at 5:33 pm (13 years ago)i used the idea for a cool valentines gift for my girlfriend.
-she loved it of course 😉 thanks!
heres a link to how it turned out:
https://www.facebook.com/photo.php?fbid=10150600168578168&set=a.10150168364968168.319042.525203167&type=1&theater
nicolesherri
February 21, 2012 at 6:04 am (13 years ago)i am so excited to try this but i was wondering how do i ‘fix’ so that is doesn’t reactivate on the wall and onto my daughters floor.
Stephanie
February 21, 2012 at 1:31 pm (13 years ago)@nicolesherri – I’ve had mine hanging on the wall since I made it and it’s been fine. It has to be really really hot for the crayons to melt so it shouldn’t melt onto your floor.
kathy bunkofske
February 26, 2012 at 6:28 am (13 years ago)since i found this site-my granddaughters and i have made four of these:) the girls and their mom went home and make ” Christmas pictures” for their teachers:) they are going to make one for their dance teacher by putting a silouhette on the canvas and melt the crayons around it. then remove the piece when done! OH and i found these canvas’ at Wal Mart–a 3 pack of 16X20 for about $5.00. they also had bigger and smaller sizes–i wouldn’t recommend smaller though
Stephanie
February 26, 2012 at 6:36 pm (13 years ago)@kathy – what a great teacher present! I bet they loved them. Thanks for the tip about cheap canvases.
Nick
February 29, 2012 at 6:13 pm (13 years ago)Would you be able to create shapes with melting crayons, and is that difficult? I was also thinking about using oil pastels I was wondering if anyone has already tried that? Thanks.
Stephanie
February 29, 2012 at 7:25 pm (13 years ago)@Nick – what kinds of shapes? See this heart shape. I think that would be relatively easy to do. I’ve never tried this with oil pastels so I have no idea if they melt like crayons. If you give it a try, come back an let us know how it works!
Nick
February 29, 2012 at 7:58 pm (13 years ago)I was thinking more of the shape of a brain, but the heart helped me out a bunch. I tried out oil pastels and they dont work the same and leave huge oil stains. I am working on an art project and this is part of my experimentation. THank you though for posting abouit melting crayons I really needed your assistance.
Evan
March 22, 2012 at 12:35 pm (13 years ago)Your kids would get a lot more mileage out of the crayons if they were used for their intended purpose… this is so wasteful.
Leah
March 23, 2012 at 12:10 am (13 years ago)Evan go away. this is awesome
Nikol
March 29, 2012 at 5:55 pm (13 years ago)Im no wiz at this I’m only in 7th grade but i think that the yellow melted slow because lighter colors absorb less heat then darker colors so i assume that your dark colors melted fast.
Anne
April 1, 2012 at 7:02 am (13 years ago)I used a heat gun and it went fast and worked great!
Bailey
April 6, 2012 at 7:34 am (13 years ago)I made this too. It splatter ALOT. I got hot wax on my leg too. It was fun though. me and my friend drew an unmbrella with a dog and made the wax drip off it like rain. So fun.
Taylor
April 6, 2012 at 7:44 pm (13 years ago)I used this concept for a school project where I used it for a header for a project board and I used black gray and brown because it was for a book report about a book about human evil and darkness which lurks in all of us.
Courtney
April 11, 2012 at 7:23 pm (13 years ago)my crayons began to melt almost immediately but I guess that means my dryer gets really hot. it only took me about 15 minutes to complete the melting It was very funny to have my puppy watch me and when i was done i sat it flat to dry she walked across it causing a small puppy print in the middle of the wax very cute luckily the wax was not very hot just warm enough to squish a little at her paw print =]
COLLEEN
April 16, 2012 at 11:05 pm (13 years ago)JOIN ENCAUSTICWORLD.COM
ALL WORK IS DONE WITH BEESWAX OR CRAYONS . . .
COLLEEN
April 16, 2012 at 11:06 pm (13 years ago)JOIN ENCAUSTICWORLD.COM
COLLEEN
April 16, 2012 at 11:07 pm (13 years ago)ALL WORK IS DONE WITH CRAYONS AND BEESWAX
Cece
April 18, 2012 at 7:18 pm (13 years ago)Wow, this is so cool I finally found a place that explains the process
Janis
April 24, 2012 at 7:24 pm (13 years ago)That is very cool!
Ella
May 4, 2012 at 2:57 am (13 years ago)This is kool
Danielle
May 30, 2012 at 5:18 pm (13 years ago)I actually just used a glue stick, and it worked fine~! (cheap alternatives GO.)
Lily
May 30, 2012 at 7:19 pm (13 years ago)OMG! I did this i took five hours but it turned out great1 Thx!
Lily
May 30, 2012 at 7:19 pm (13 years ago)OMG! I did this i took five hours but it turned out great1 Thx!
Sandra
May 31, 2012 at 1:52 pm (13 years ago)I saw one of these at my son’s dentist office but it was done with green and brown crayons, then they put little flowers on it turned upside down, it looked awesome. I can’t wait to try it, thank you!
gjawua
June 5, 2012 at 7:04 pm (13 years ago)How to Make Rainbow Melted Crayon Art | 52 Kitchen Adventures I was recommended this blog by my cousin. I’m not sure whether this post is written by him as no one else know such detailed about my difficulty. You’re amazing! Thanks! your article about How to Make Rainbow Melted Crayon Art | 52 Kitchen AdventuresBest Regards Craig
Sha Mancha
June 5, 2012 at 8:43 pm (13 years ago)Keep working ,fantastic job!
memaw
June 24, 2012 at 7:34 pm (13 years ago)looks pretty cool
Crafty Mama of 2
June 25, 2012 at 12:59 pm (13 years ago)My 6 year old & I are doing this TODAY!! With record high temps (102) here in Colorado, we thought we would try it a few different ways! Leaving it outside to see what happens! We have another canvas that we are going to use a heat gun (the kind that is used to put shrink wrap on a box)(one of my many tools that I personally own for crafts, etc) I cant wait to see the results. It is going to look amazing on our wall of art. My hubby & his mom are artists (he with oil paint & she with chalk), however, I, CRAFT. So, our daughter gets it from the both of us! We have lots of birthday’s coming up, and we like to bring home made presents. This will be a wonderful gift for anyone of all ages. (I think I just crossed off everyone on my christmas list for this year with this amazing idea)!!! Thank you so much for posting it on pinterest (a crafters dream of finding new and creative ideas)
Josh
July 3, 2012 at 10:02 am (13 years ago)So my best friend and I have done a couple of these over the past two days. Worked perfectly. Except it didn’t take an hour and a half for it to melt. Maybe took us 10-15 mins.
Sydney
July 5, 2012 at 1:05 pm (13 years ago)This project was GREAT for me on a rainy day, thank you so much for the thorough tutorial and mine came out great! Thanks again!
Sorcha Donnelly
July 5, 2012 at 3:44 pm (13 years ago)Hey!
With regards to your melted crayon tutorial, I’m looking forward to trying this myself, however i have heard that only Crayola Crayons work- can you confirm this??
Many thanks, Sorcha
Stephanie
July 6, 2012 at 8:04 am (13 years ago)@Sorcha – yes, I used Crayola and I’ve heard that cheaper brands don’t melt as well.
Kim Hyman
July 10, 2012 at 8:23 am (13 years ago)Loved this project. I intend to hang it in my elementary art room. I used only the primary and secondary colors to emphasize the color wheel. I also did a free form one working with one color at a time, I held it in my hand and rotated the canvas for a more abstract design. Line work was very simple to achieve. Really interesting results and so much fun!
sarah
July 10, 2012 at 1:57 pm (13 years ago)what was the glue stick for??
Stephanie
July 10, 2012 at 2:02 pm (13 years ago)@sarah – the glue stick goes into the glue gun, which is used to adhere the crayons to the canvas.
Lauren
July 11, 2012 at 9:35 pm (13 years ago)This is such a great tutorial! The wording and pictures combined make it easy to follow the step by step process. I’m relatively new to the blogging world and I recently started a crayon art blog. I’m trying to do a step by step tutorial and would love your feedback. http://www.themeltedcrayon.blogspot.com
Lomosio
July 17, 2012 at 2:30 am (13 years ago)Oh wow I loved this so much I just had to try it out for myself. I couldn’t believe just how simple it was and soooo much fun too.
Check out mine:
http://lomosio.wordpress.com/2012/07/17/crayon-art/
Lomosio recently posted Crayon Art
Kristin
July 17, 2012 at 10:28 am (13 years ago)I wonder if it’s possible to break off the glued crayons and replace them with new ones so that the crayons have the tips and it seems like a seamless flow between a good crayon and the melted crayon?
Stephanie
July 17, 2012 at 10:56 am (13 years ago)@Kristin – I don’t see why not. I would probably use either just a dot of hot glue or use a less permanent adhesive so they’re easier to break off.
Kristen
July 19, 2012 at 6:42 pm (13 years ago)http://Www.facebook.com/kraftykristen
(or you can just go to your Facebook and type Krafty Kristen into the search bar)
I do crayon art and sell it! I’ve posted pics of a few I’ve done an other things I do!
rads
July 23, 2012 at 6:45 am (13 years ago)should we use wax crayons or oil pastels?
Stephanie
July 27, 2012 at 10:38 pm (13 years ago)@rads – wax crayons. Crayola brand is best.
mary
July 27, 2012 at 1:17 am (13 years ago)I love this idea! This would make the perfect give for anyone! 🙂
mary recently posted How to Make Fortune Cupcakes (Free Printable!)
Riane
July 27, 2012 at 8:31 pm (13 years ago)I did this using 4 smaller canvases and then hung them in kind of a spiral pattern above my bed. Each canvas is a different color scheme. So cool!! Quick and easy…and the smaller canvases take much less time to melt. I got a two pack at Walmart for about $3 and bought two. I used two 64 packs of crayons (with some “unwanted” colors leftover)
Ashley
July 28, 2012 at 9:52 pm (13 years ago)I tried a version of this with a stenciling technique, check it out!
http://whybeo.blogspot.com/
Kallie
July 29, 2012 at 1:14 pm (13 years ago)Check out my website. Crayon art for sale!:)
http://www.kallieskrayons.weebly.com
I’m so passionate about crayon art!
Gina
August 3, 2012 at 10:37 am (13 years ago)I am doing this for my daughter as a surprise for her dorm room. It will be in shades of blue (her favorite color) and I am going to use crayons we have from her 12 years of school. We have a HUGE tub of them and I thought it would be cool to use ones that she had actually colored with when she was younger. The canvas I have is pretty big, so I may have to supplement with some new ones. I am super excited to try this – thanks for the tutorial.
Della
August 22, 2012 at 5:29 am (13 years ago)Hi! I’m so amazed with your artwork. It’s such a great artwork! 😀 <3 I think I'd like to make one by myself. This tutorial is really helpful for my next artwork. Thank you so much:)
I wanna ask you some questions to prevent some failures in proccess of making this melted crayon art. You mention that you use a hot glue gun for making this art work, i don't know exactly what's a hot glue gun because I barely find it on supermarket (it's quite hard to find it in my hometown, anyway). So, I wanna replace a hot glue gun with an ordinary glue stick. Is it work if I use an ordinary glue stick to adhere the crayons? If it's okay, Is it less-sticky and less permanent than a hot glue gun does?
Stephanie
August 22, 2012 at 9:41 am (13 years ago)@Della – a glue gun is much stronger than a glue stick. A glue stick won’t provide a strong enough bond. You might be able to use something like tacky glue, but I don’t know if that will hold up. Can you order a glue gun online? Here’s a link to one at Amazon that comes with glue sticks.
Carolyn
August 27, 2012 at 11:21 am (13 years ago)How did you get the colors to blend so well at the top? I have a lot of white space on my canvas.
Stephanie
August 27, 2012 at 2:27 pm (13 years ago)@Carolyn – without being there, I’m not sure why you ended up with so much white space. My crayons have always melted straight down with less than an inch of white space. It might have something to do with the angle you held the dryer or the power of it. If it blows on the crayons too hard or hot, they tend to splatter more.
Carolyn
August 28, 2012 at 3:51 am (13 years ago)Ok, thanks. I’ll keep trying. What angle seems best? Or did you find you had to move around? I noticed once the first drip went down all the other drips followed the same path leaving spaces. Maybe my dryer is too hot.
Carolyn
August 30, 2012 at 7:05 am (13 years ago)I figured out the problem. I was using a small canvas to do a trial run. It needs to melt more in order to cover more space between each crayon. Thanks for the tutorial. It was very helpful!
Stephanie
August 30, 2012 at 9:25 am (13 years ago)@Carolyn – so glad you figured it out! That’s good to know. Thanks for coming back and letting everyone know what went wrong.
Lizzie
September 8, 2012 at 12:57 pm (13 years ago)Hi this is amazing but i would like to know a few things like where did you get a canvas at? And does it matter on the type of crayon used?
Stephanie
September 9, 2012 at 10:30 am (13 years ago)@ Lizzie – you can buy canvases at any art or craft supply store (I got some at Michael’s). I recommend Crayola crayons because they melt the best. There are links to where you can buy a canvas and crayons online in the post (under the second photo).
Bette A. Stevens
October 21, 2012 at 11:05 am (12 years ago)I love art… This is awesome! THANKS. Bette
Antonio Bolen
November 11, 2012 at 2:48 am (12 years ago)Thanks again Serena. It was fun and a pleasure to participate.
Anna
December 6, 2012 at 4:55 pm (12 years ago)I would love to do this myself. I just need to get a hot glue gun…
Anisha
December 8, 2012 at 9:06 pm (12 years ago)does the wax peel off after some time?
Stephanie Nuccitelli
December 9, 2012 at 8:53 am (12 years ago)Anisha, sometimes a small bit will peel off, but I’ve had mine for for almost a year and a half and they’re pretty much fully intact.
l8n
December 16, 2012 at 8:25 pm (12 years ago)i DID THIS! CHECK OUT MY VIDEO! LIKE IT TOO :))) http://www.youtube.com/watch?v=uN5NQv_6w1M
Ronnie
December 25, 2012 at 2:09 pm (12 years ago)I suggest glueing the CANVAS and not the crayon. I did it on the crayon first and it didn’t stick. All it did was peel the wrapper off the crayon. But other than that, I had/created two beautiful pieces of art!!! Thank you for this!
Judy Cooper
January 9, 2013 at 9:39 am (12 years ago)What a beautiful art project! I’m going to reference this on a future post I will be doing on Fun Art Professor. The post will probably be titled, “Color My World”.
charlotte pulo
January 12, 2013 at 3:25 pm (12 years ago)i did this at home i had a few hick-ups a long the way but it turned up awesome !!!
Heidi
January 21, 2013 at 10:49 pm (12 years ago)The reason why dark colors melt faster is because you notice when you wear black and dark colors in the sun your hotter than if your wearing brighter colors!!
Debora Wayson
February 5, 2013 at 6:00 pm (12 years ago)Everyone has seen the tired old science fair project, such as the volcano or the styrofoam solar system, which have been favorites of many parents for what feels like generations. These projects are relatively simple and easy from the parent’s point of view, but they are incredibly bad choices for the children involved. Why?These are the kind of projects that are so well-known that even the students know what is going to happen. And when that happens, the students are not learning anything, and their performance suffers during the presentation portion of science fairs because of it. Science fair judges have gotten bored with these types of projects, and that’s a big problem for students who endeavor to win prizes in their science fair. In the end, this kind of project is only really good for the parents, and surprisingly, these kinds of projects are not even particularly cheap!^
Our very own web-site
<http://www.beautyfashiondigest.com/scalp-sores/
Janice
February 6, 2013 at 10:34 am (12 years ago)Word of advise….try the embossing tool that stampers use. It like a hair blow dryer but it’s hotter & doesn’t blow as hard. I’ll give it a try to see how it works. Probably won’t take as long as well as not as messing if you want individual drips down the canvas.
Lexi
February 7, 2013 at 7:22 pm (12 years ago)http://www.youtube.com/watch?v=qQFiEYvmaaQ look at this video on how to melt crayons! 🙂
naomi
February 16, 2013 at 3:24 am (12 years ago)I have done this for my art; I love the results ! However using card and paper, the crayons dry and crack badly; doea the canvas ensure this wont happen ? Please help .. Thanks
Janice
February 17, 2013 at 11:28 pm (12 years ago)The embossing tool worked beautifully. You have more control on the drips to the crayons. And yes, doing it on canvas will protect it from cracking. I tried it on paper & used a punch to add a heart and I had to then reheat the heart to mend the cracks. I liked that each crayon dripped individually.
Katri
March 6, 2013 at 4:07 am (12 years ago)An amazing idea!! I’m definitely trying this! 🙂
Mikayla
March 10, 2013 at 7:27 am (12 years ago)This was really helpful u should do more on crafts
Craigie
March 27, 2013 at 9:19 am (12 years ago)3 additional tips I would like to submit per my experience:
1. Before starting, paint the canvas the same color as the wall behind it. This gives the effect that the crayons were actually melted ON the wall (not to give kids any ideas!) but without the mess.
2. Apply the glue directly to the CANVAS, then quickly stick the crayon on before it cools, not on the crayon itself. This saves a lot of time and avoids burns from the hot glue.
3. When the wax has hardened, take a rag (or brush) and daub a glossy polyeurathane over the crayons–it gives them a very lusterous shine and brings out the pop of colors.
Have fun!!!!!!!
Camilla
April 6, 2013 at 1:18 pm (12 years ago)Wow! That is so cool! Thanx so much for posting this:D
Kalina
April 27, 2013 at 1:09 pm (12 years ago)Darker colors tend to be better insulators (conduct heat better) because they absorb more of the things around them (such as light) than the lighter colors do. Remember, when you see something that’s red, for example, that object is absorbing every color except red, which it is reflecting to your eyes. The darker colors tend to be a combination of more colors, therefore reflecting off less light and coming off as dark. I assume it works the same way with heat. Try it. Get two full-size ice cubes and two sheets of construction paper (one black and one white) and set them outside in direct sunlight, one ice cube on each sheet. You’ll see that the ice cube on the black paper melts faster.
Toya R
April 29, 2013 at 11:09 am (12 years ago)what a great idea. now I know what to do with all the left over crayons now that my children don’t need them.
Emma yehl
May 2, 2013 at 3:48 pm (12 years ago)I love how it looks I want to do that now
Riley
May 11, 2013 at 1:23 pm (12 years ago)i tryed this but i did not have that many crayons and it was going to be a mothers day gift but i guess i cant get it right 🙁
Zoe
May 11, 2013 at 11:29 pm (12 years ago)Hey. i was looking at your tutorial and how expensive are the glue guns because i was thinking mybey in stead of that could i just use PVA glue. I really want to try this out but dont have a glue gun. Would PVA glue still work?
Zoe recently posted Homemade Marshmallow Fluff
Melissa Bacon Rolland
May 23, 2013 at 10:05 am (12 years ago)Hi! I used to work at HEP when you did. Nice to find you here! I am going to get my craft on. 🙂 Hope you’re doing well!
Julie
June 13, 2013 at 6:10 am (12 years ago)I actually tried it on my blog http://julielesbottes.blogspot.fr/2013/06/arc-en-ciel-de-crayons-gras-fondus.html Not really what I expected! Plus the glue melted as well and some of the crayons fell down. I had to take all of them out in the end. But I’ll try again! Thanks for the tuto.
Julie recently posted Arc-en-ciel de crayons gras fondus
Carolyn
June 13, 2013 at 4:04 pm (12 years ago)Julie, You should try using a bigger canvas and Crayola crayons.
Lauren
June 21, 2013 at 1:44 pm (12 years ago)I love what you did here! I’m totally gonna try. I have 32 CRAYOLA crayons. I saw Julie’s mistake. Crayola crayons are the best brand to use for something like this- in my opinion.
c.
July 1, 2013 at 7:45 pm (12 years ago)i did my melted crayon art the same (horizontal) way. But, I am going to hang up the painting vertically so the melted crayon looks like it is coming from the side. Do you know a really good way to hang up the painting, because I’ve tried about 4-5 times and it always ends up lop-sided due to its weight. PLEASE HELP ME STEPHANIE!!!! 🙂
Siesie
July 8, 2013 at 3:20 pm (12 years ago)I’m no chemist, but I think yellow melts slower because of the wax-pigment ratio. Since yellow is a light color, not as much pigment is needed, so the wax is harder. I’m guessing a highly saturated color like red, or a really dark color like purple, would melt more easily because of the high pigmentation.
But this is just my guess–I could’ve completely wrong!
James
July 27, 2013 at 9:19 am (12 years ago)Anyone looking at doing this, Walmart is selling 8-shade packs of each color group for $0.79 in the back-to-school section! I picked up a few of each color group so I could do this and not have leftover colors!
Jennifer
August 20, 2013 at 5:30 pm (12 years ago)I wanna know you did it so perfectly. How many attempts before you got it like this? I just did it and it looks nothing like your pictures
Stephanie Nuccitelli
August 21, 2013 at 11:41 am (12 years ago)Hi Jennifer, I did it once before taking photos for this post, but it turned out the same way. What does yours look like? It could have something to do with your heat source.
Pragati
September 17, 2013 at 10:10 am (11 years ago)Will super glue work as well as a hot glue gun?
Stephanie Nuccitelli
September 21, 2013 at 1:52 pm (11 years ago)Pragati, I’ve never tried super glue, so I’m not sure how the heat will affect it. Sorry I can’t be more helpful! If you give it a try, let us know how it works.
maria f.
September 26, 2013 at 4:01 am (11 years ago)Just to let you know I gave you a shout out on my blog today:
http://rieslingmama.blogspot.de/2013/09/playing-with-crayons.html
Stephanie Nuccitelli
September 26, 2013 at 3:52 pm (11 years ago)Thanks Maria! 🙂
jojo johnson
October 9, 2013 at 1:43 pm (11 years ago)this is so cool it makes me feel like I am in the 1frst grade… 🙂
Anna
October 12, 2013 at 3:46 pm (11 years ago)Thanks!!! I’ve been waiting to do this craft FOREVER!!! And I couldn’t find a tutorial 🙂
Haley B
October 22, 2013 at 12:54 pm (11 years ago)using this method with blue and yellow crayons to create a night sky for a project! so excited!
mirren
October 25, 2013 at 2:20 pm (11 years ago)Is this crayon art better with the crayon with the pointy ends or the straight circle ends? thanks xx
Roxanne
December 6, 2013 at 8:27 pm (11 years ago)I have done this awesome art idea but i am wondering if there us something that you can spray on it to take the wax smell away? We made a very large canvas using 80 crayons. Any suggestions would be great!
Katie
January 1, 2014 at 3:19 pm (11 years ago)great and helpful
Rubie Grayson
January 3, 2014 at 1:20 pm (11 years ago)I just did this with my daughter this week and it was so much fun. I shared your link with others and hopefully your readers will like my artwork too.
Someone who does crayon art
February 4, 2014 at 7:42 pm (11 years ago)You asked why some crayons melt slower than others and that would be due to the pigments in the crayons, different colors will take less time to melt than others, I have found that browns are probably the slowest though I also use a heat gun which heats them up a lot quicker
it is also important to note that you shouldn’t take your crayon art piece out into freezing weather… cracks them up, I learned that the hard way
Denise
February 14, 2014 at 8:35 pm (11 years ago)Does anyone know where I can buy crayons in bulk? I don’t want to buy so many boxes of crayons if I want to use only a few different colors.
Amber Tebben
February 26, 2014 at 7:13 pm (11 years ago)I have seen this idea in many place before and even seen a classmate try it and it has worked! I am really tempted to try it as the end result looks very cool, but haven’t had the time and I’m worried it won’t turn out as nice as the ones I’ve seen. I especially like how you included materials and the steps you need in order to do this project. They were very simple and easy to understand. I like how you found a good use for the color choices that didn’t make the cut for your canvas. This way you aren’t wasting something you spent money on and they are getting well used. It sounds like covering the area in which you will be working is also a must as it sounds like the wax splatters a bit while melting it. Including your approximate times will help those people who have never done it before estimate the time it will take them. That is sometimes nice to have because it could seem like it will never melt after the first couple minutes. It is nice to know that hot glue worked for you because I know of a few people where it has not! Again, creative idea! I hope to try it very soon!
pickles
March 24, 2014 at 4:59 pm (11 years ago)The yellow melts slower because there is less pigment in it but the red probably melted faster because there is more pigment in it
Raine
July 27, 2014 at 6:51 pm (11 years ago)I did this today with my son and I used a Nicole Heat Tool and it went quite quickly. I actually had to stop at one point because I think they were getting too hot and a little smokey. I highly recommend the heat tool, but it drips all the way to the bottom, so you definitely need some newspaper. Thanks for the great tutorial!
Raine recently posted Happy?
arzak
April 16, 2016 at 4:52 am (9 years ago)i woukd like to try it looks so cool !!!
Martima
August 31, 2016 at 4:03 am (9 years ago)Hi! That’s amazing. Could please tell me the exact order of the crayons? I’m trying to order them but I am not able to have a good effect. Thank you
Sheila
February 21, 2017 at 3:46 pm (8 years ago)What is a real world use for this? I’m a child doing this for a science fair project, I don’t know what you can use this for.
My site plan
August 20, 2017 at 5:39 am (8 years ago)wow you are so artistic and cool. I will try it with different color patterns and decorate my son room with it. If you would like for us to conceptualize a space we are able to take the exterior wall dimensions and create living spaces to your specifications. Have a 1000 square foot residence and want a 2 bedroom, 1 bath with kitchen and living area? We can create a series of options for you to understand the use of that space. This is also a popular service for commercial applications for tenant improvement possibilities.
stephanie
April 19, 2018 at 1:48 pm (7 years ago)is this project fun
James
March 30, 2021 at 4:23 pm (4 years ago)Your rainbow crayon art is being used on a shirt on Amazon. I received the shirt and it was obvious that they’d grabbed some image off the internet and tried to erase the white background. But a quick Google search brought me to your page.
If this is your art, it can be reported to Amazon for copyright infringement.
https://www.amazon.com/dp/B07T19DB8Z